UNIT 8 & 9. (LO1) Being able to use lighting sources for photography. RESEARCH painting by three artists. ONE TO REPRODUCE as a PHOTOGRAPH. UNIT 9 DIGITAL imaging and printing.
UNIT 8 LIGHTING IN PHOTOGRAPHY 3 (LO3) BE ABLE TO USE LIGHTING SOURCES FOR PHOTOGRAPHY. A.C.3.1 use a range of lighting sources to photograph a range of subjects to meet identified goals. INCLUDING STILL LIFE.
Unit 8 Lighting in photography.
Learning outcome 3 (LO3)
Being able to use light sources for photography.
RESEARCH three artists one for possible use in the studio.
THE THREE ARTISTS AND PAINTINGS I CHOSE ARE: 1) REMBRANDT'S - THE APOSTLE PAUL
2) PIERRE - AUGUSTINE RENOIR - THE READER
3) STEFANI ORMAS - SMILE.
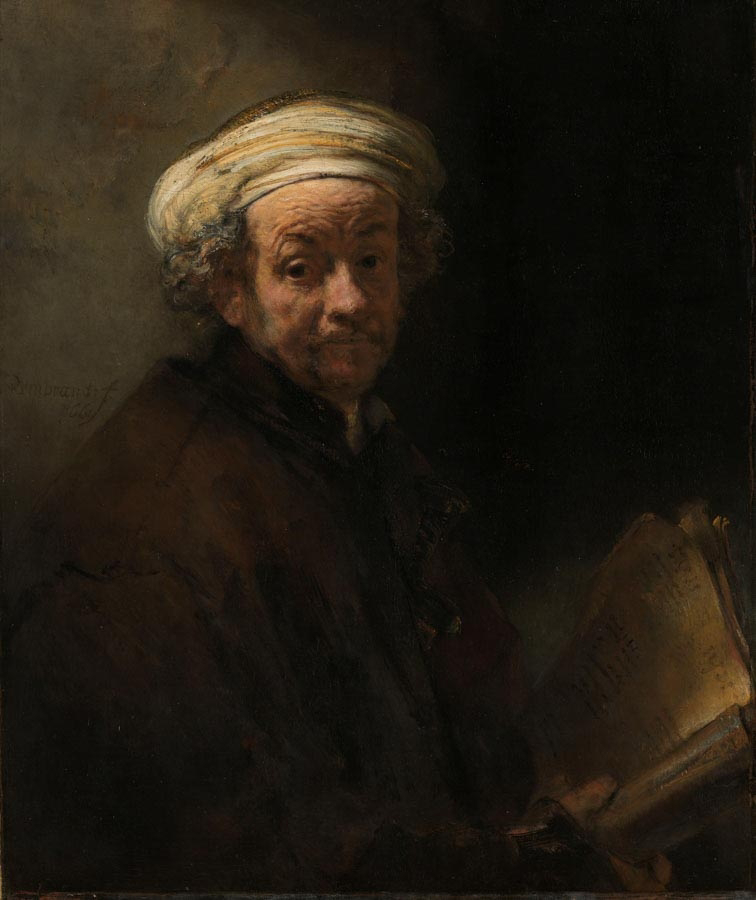
Throughout his life Rembrandt focused on the apostle Paul, maybe because Paul's writings were the most important source of the Reformation theology, or perhaps he personified what Rembrandt considered the Christian ideal of someone who received God's mercy without merit. Sitting at home in his prison cell, the apostle ponders the words from God he's about to write in the letter to the Ephesians. The serious strong features underscores his belief and sense of purpose.
I chose this painting because of the light, and how it falls on Rembrandt's face. This is an example of what is know as Rembrandt lighting. It's often used in portrait photography. Apparently, it isn't too difficult to set-up. So, it's a painting which I'd like to duplicate for my studio portrait shot.
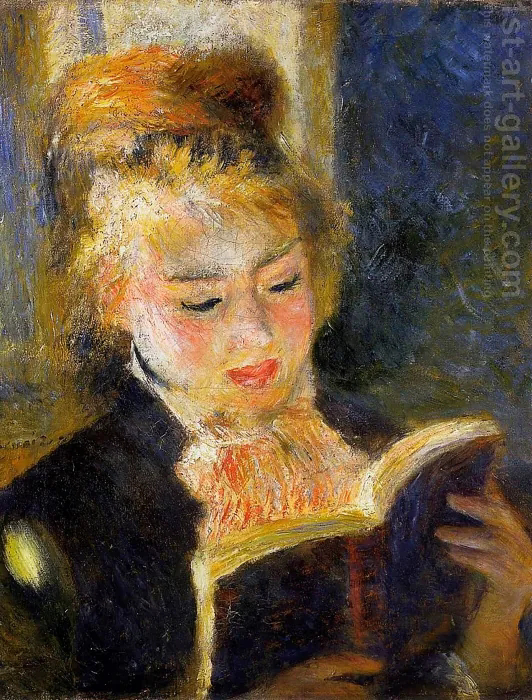
This is the painting by Renoir.
The brilliance of the model's face is reflected in the light. She has a skin which is like a reflector of the light. And for Renoir this meant painting non - stop. He certainly made a dazzling painting of this subject. The light reflected from the book makes the shadow from her face transparent. The head looks as if it's lighted from within.
The painting is of a model who Renoir often used. Her name is Margot. Margot is described as having curly Auburn hair, sparse eye brows, red lashless eyes, a wide nose , plumb cheeks, thick voluptuous lips curled in a scornful smile and noisy vulgar with her suburban accent. I chose this painting, not only because Renoir is one my favourite painters. But primarily because of the light. Further to that, the pose of the sitter, and because she seems oblivious to anything happening around her. She's completely absorbed. It is also a painting I believe I could try and reproduce as a photograph.
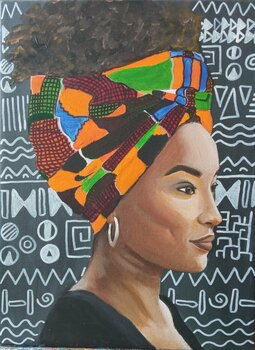
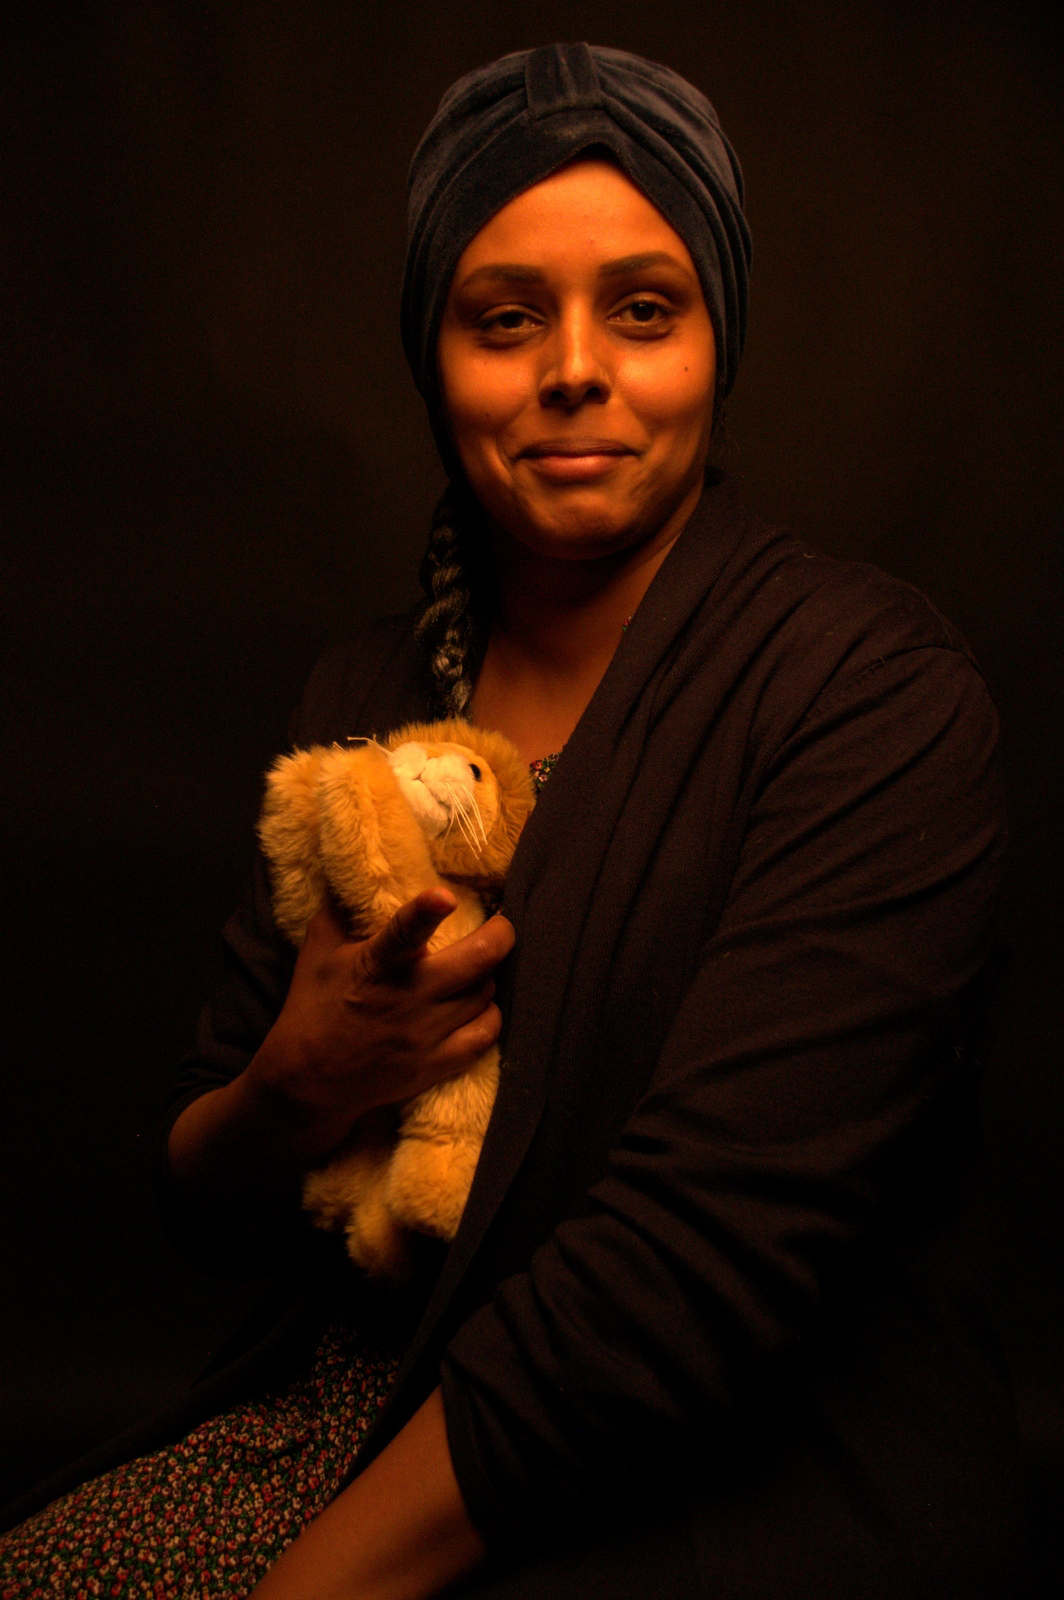
Stefani ORMAS - Smile
This is by a contemporary Italian artist. Who likes to make paintings of women. She gives them a voice and representation. I could have easily chose another one of Stefani's paintings. But I decided on this one, because I like a number of things about it. I like the heiroglypic African type background. The African inspired headwrap. The texture and lighting of the face and neck. And the fact that I wanted to add something modern and up to date. And a person of colour.
Below is is a link to how I want to go about recreating the REMBRANDT lighting.
I will use either a male or female model. The background need to be black. I'll need a book and clothing much the same as those worn by Rembrandt. Plus the studio light as per the set-up in the link.
https://blog.elixxier.com/en/mother-of-all-lighting-setups-the-rembrandt-light/
Ok
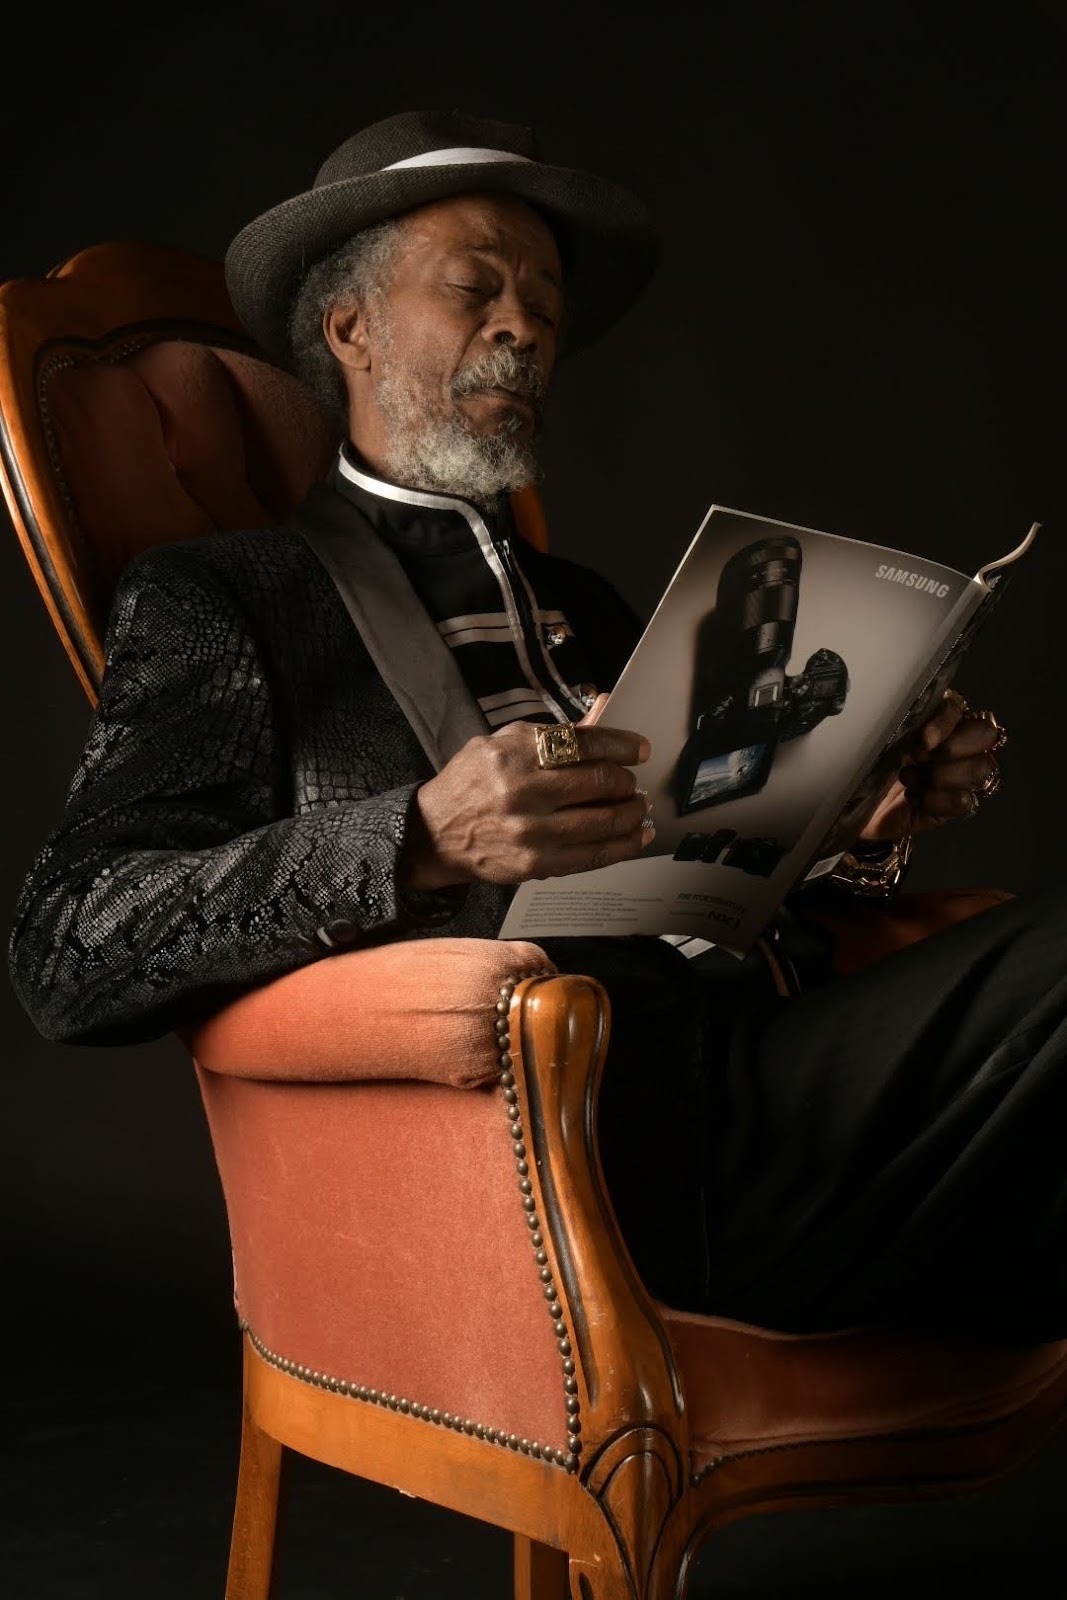
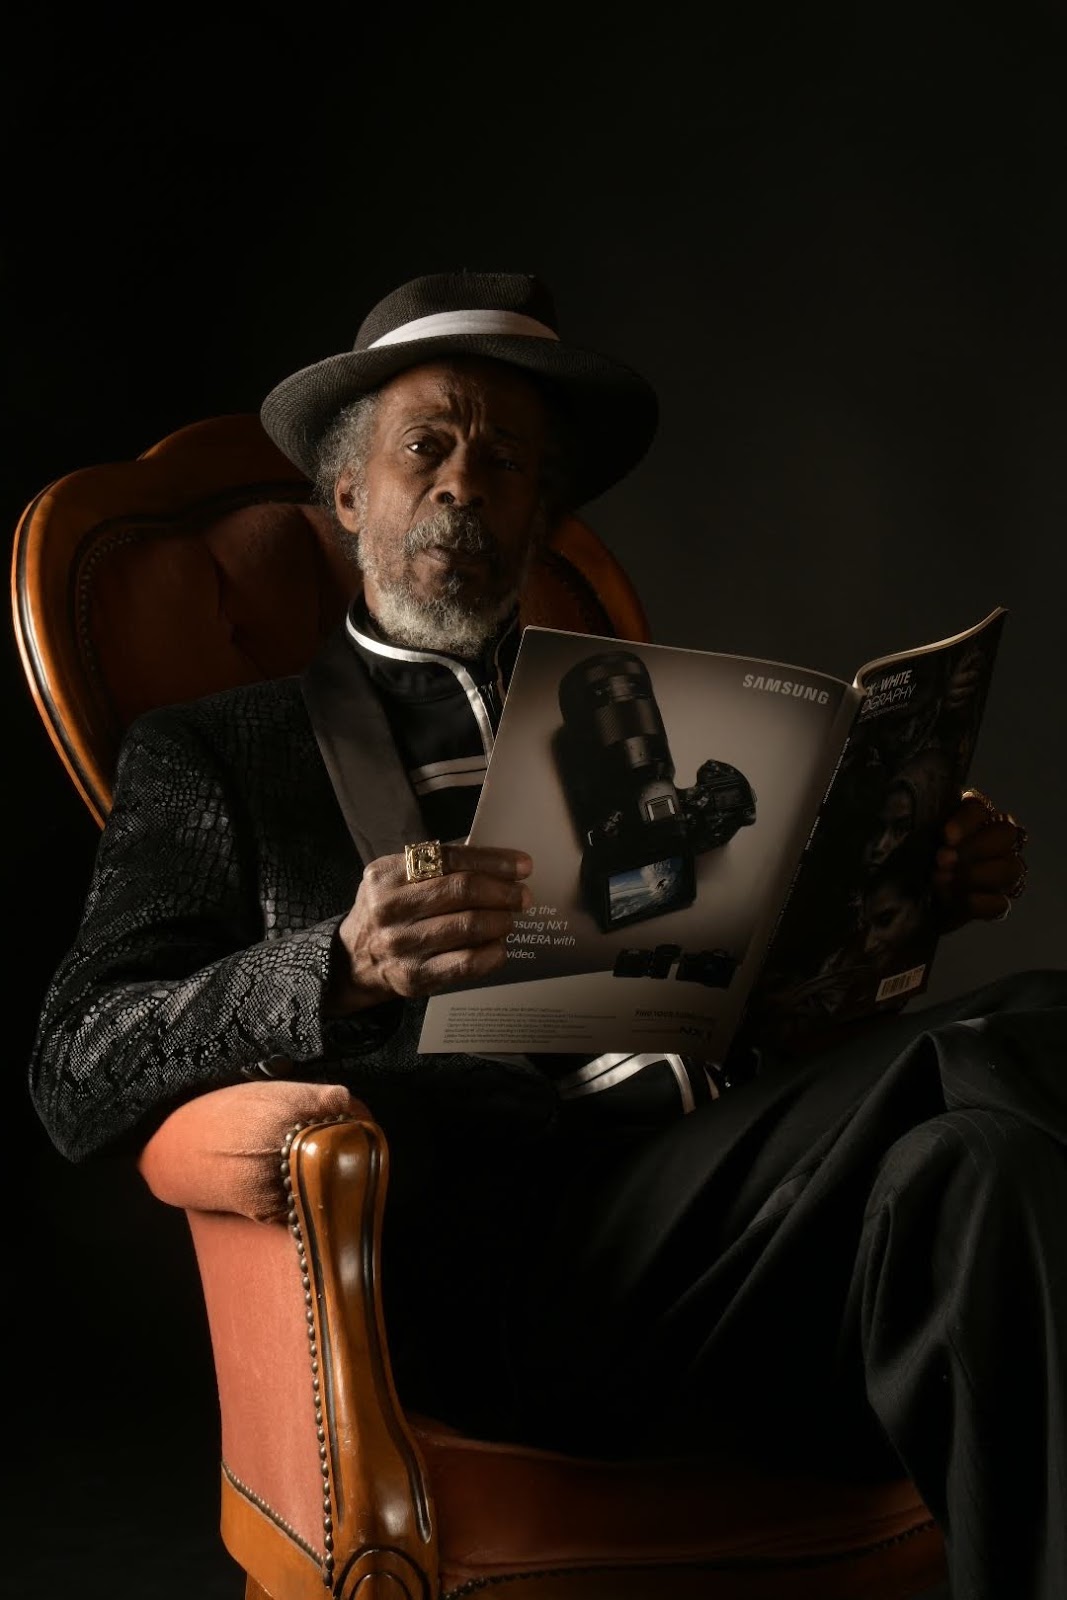

Here are three renditions of the Rembrandt Painting. I believe that the final picture is a good interpretation of the painting. For all three photographs a fill flash was placed to the left of the subject. Which was triggered by the sync on the camera. At the front of the subject was the main light. I experimented with both lights. Altering the output of the intensity of the lights. Using a reflector to the right of the subject. And placing the fill flash nearer and farther from the subject.
Lighting in photography.
3 (LOC3) AC 3.1 Use a range of lighting sources to photograph a range of subjects to meet identified goals.
In this assignment I used various strobes at different settings and distances from the subject to produce a range of photographs in the studio

3 (LOC3) A.C. 3.2 Analyse and evaluate lighting for photography.
As stated in A.C. 3.1
There are a range of lighting sources which can be used in photography.
Which such a variety. The photographer has to decide preferably beforehand the kind of lighting they require. Failing to do so, could potentially be a waste of time and money. You have to remember that in addition to studio lighting. There's also natural lighting. If you were shooting outdoors. The time of day would be a factor. Also the weather conditions on the day. Sun is good, but so is rain, snow, wind, hail etc. All of these lights need to be harnessed to produce the required result. So, to conclude photography is all about controlling light, in its various forms.
TTap on a clip to paste it in the text box.Tap on a clip to paste it in the text box.ap on a clip to paste it in the text box.JCUNIT 8 LIGHTING IN PHOTOGRAPHY . HEALTH AND SAFETY.(LO4)
Understanding photographic practice and health and safety procedures.
LO4 HEALTH and SAFETY.
Identify and use safe working practices in lighting for photography.
In the photography studios there are a number of health and safety rules and regulations that must be adhered to for the benefit of all. Those working in the studio wouldn't want to bring any drinks or food into the invirnoment, these could damage costly equipment and potentially cause electric shocks. It's also important that cables are tidy to prevent anyone from tripping. The light stands and tripods need to be checked so that they're in good working order. Bulb should not be touched this could cause burns. Any suspended equipment should also be checked. We would want anything to fall on someone while in the studio. The studio should be organised and kept tidy. If item can be in their rightful place. When needed valuable studio time will be saved. We won't have to be looking for that piece of equipment. Also, if a computer screen is going to be used to check the shots. Make sure the overall time is checked. The lights from the strobes, lights and screens could have a negative impact on the eyes over long periods of time. Take short breaks from the studio , if you're going to have a long session, or even if not. Have regular breaks, walk around, etc. And return to the session refreshed.
At the end of each studio session someone should be assigned to tidy up. To make sure that everything will be in place for the next team/ person or who'll use the facilities
TASK 2
STILL LIFE - using a classical painting as inspiration.
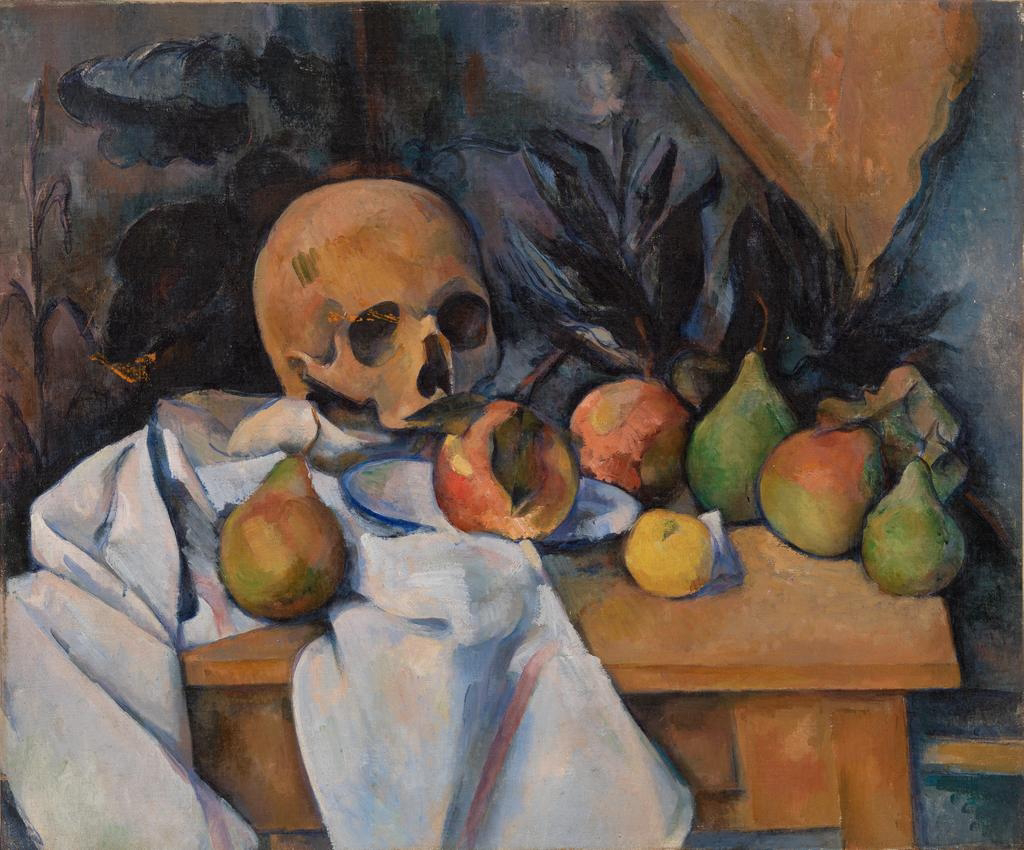
After looking and studying various still life paintings. The one I finally chose was : Paul Cezanne's - The skull still life.
I'm not entirely sure why I chose this, as I could easily have chosen something by RENOIR. RENOIR bring one of, if not my favourite artists.
The skull still life was painted by Cezanne towards the end of his life. When he having had family difficulties, he lived alone in Aix-en-Provence. The painting has a morbid streak to it as did all of Cezanne's work during that period. This could well be due to the fact that he was coming to the end of his life. The skull is accompanied by a white cloth on a table, and a variety of fruit. The fruits in greens, reds and yellow. Look good enough to eat. The skull which is staring down at these symbols of life, brings a kind of deathliness to the scene.
It's ironic that the different colour tones of the fruit together with the skull. Seem as if life and death are blurring into one. Exactly where the scene takes place is left to the viewer's imagination. We don't know how the skull came to be placednext to the fruit. But as observers we can only imagine. What is more important is how the image makes the viewer feel. What emotions does the painting conjure up.
Cezanne has long been a popular subject for artistic prints. His prints decorate homes the world over. But we can't celebrate Cezanne's work without acknowledging his confrontation, and flirtations with the macrbe and death.
Having researched the painting I got a lot more from the process than I expected.


Unfortunately on the day I was going to recreate the Cezanne painting. Because of various reasons. Things didn't go as planned. However, I had a variety of set - ups in the studio.
The top photograph is a still which contains fruits. Which would are in my Cezanne still - life. And the bottom image does include a skull.
It would have been a lot better if I included the skull in the picture of the fruit.
UNIT 9 (LO1) UNDERSTAND DIGITAL IMAGING AND PRINTING.
AC 1.1: Identify the characteristics of digital imaging and printing for a range of situations.
I had to prepare and email mages to a Photography service for printing. I decided to use the images in a RAW format. Theses files carry a lot of information and need to be put in post production to make them look the best they can be. There are various software programs which can be used for this. Including, Photoshop, lightroom and Captureone. In my case I used lightroom. I had a version on my smartphone which is the version I used the most.

JPEG on the otherhand has less information in the files and usually looks good as is.They are inherently brighter than a RAW file. These files can also be put in post-production, but you'll have less latitude to adjust than RAW so most people don't bother doing this. JPEGS are usually used if you're not engaged on a professional assignment/setting and require just a casual shot i.e. for family/friend at a picnic, gathering, and so on.
(LO2) Be able to produce digital images and prints.
AC 2.1 Produce digital images to achieve a range of solutions to identified goals.

AC 2.2 Produce digital prints from digital imaging sources to achieve a range of solutions to identified goals.
I then met the gentleman who owns the service and discussed what I required. It took a while before I settled on the kind of paper. And also the size of the prints.
In the end I went for Photospeeed pearl 290 paper. And a A3 size. In addition to using RAW for an optimal quality print. Something called d.p.i. is also a factor. D.p.i. means dots per inch and the more dots that a photograph has per inch the better the quality. In my instance 844 d.p.i. was used.

However, these are just a guide as to how the final prints will look. Having seen this mock up of my final print. I then gave the go-ahead to the printing technician.
The turnaround was pretty quick. I discussed this with the technical on a Friday and they were ready to be collected on the Monday.
Having collected the prints. I gave each picture a title. I called the upper photograph
" The Ponderer" and the lower " Man with open Coat". I also came up with a price that I'd like each photograph to be sold for. I then handed these to my tutor for inclusion in the " Intimate Portrait" Exhibition.
The pictures were duly framed and hung as my contributions to the final year Exhibition of 2023.
AC 2.3 Analyse and evaluate digital images and prints.
In my evaluation the process went quite well. From digital images to the final prints. Choosing and uploading the files was straight forward. But the whole process was a learning curve, and I was also working to a deadline. I was very pleased with the quality of the photograph as the choice of paper and the d.p.i. made the pictures extra special. The hard work paid off. People commented positively on my photographs. All of this was done during a very stressful and tiring period of my life. If I was asked to do this again. I'd hope would be under more favourable circumstances. I believe that the exhibition went well, and that dispute all the mishaps, which was a part of the learning process, it was a great success. I was pleased to add my contributions to the project/exhibition, and will go on developing and improving my abilities and craft.
UNIT 9 3 (LO3) UNDERSTAND PHOTOGRAPHIC PRACTICES AND HEALTH & SAFETY PROCEDURES.
AC 3:1 Identify and use safe working practices within digital production facilities.
When in a digital production facility it is good practice to protect your eyes. This can be achieved by taking periodic breaks away from your computer screen. Going away from the environment is also good. So take a walk outside, have a drink, relax. You'll be able to return refreshed and with fresh eyes. If needed tired eyes might also benefit from rye drops to keep them fresh. Make sure that if you're using your camera that the Diop for you eyes are adjusted. This will enable you to get the correct focus for your eyes.
Your chair needs to be adjusted to the correct height for comfort when sitting at your desk. The correct posture needs to be employed so as to prevent you from getting a bad back. The design of some computer keyboards also prevents the straing of your fingers and hands.


Comments
Post a Comment